Difference between revisions of "GBDK Sprite Tutorial"
(→Tools: Adding internal links) |
m (→Drawing sprites to the screen) |
||
| Line 57: | Line 57: | ||
#include "smile.c" //double quotes check the folder of the code that's being compiled | #include "smile.c" //double quotes check the folder of the code that's being compiled | ||
</pre> | </pre> | ||
| + | |||
| + | Note: in some cases, it may be necessary to include the complete file path (ex. <code>"C:\{file path}\smile.c"</code>) in the <code>#include</code> statement for smile.c | ||
| + | |||
Every C script needs a <code>main</code> function, so throw one of those in: | Every C script needs a <code>main</code> function, so throw one of those in: | ||
Revision as of 19:27, 28 June 2016
Contents
Introduction
This tutorial seeks to present a workflow for getting multiple sprites to display and animate. So as to make it as accessible as possible, I'm assuming no knowledge of C. If you don't want to comb through reference files for hours before jumping in, this is for you.
Tools
You will need: GBDK, a text editor, Game Boy Tile Designer, and an emulator (BGB is recommended for its many debug features), and any level of knowledge of C.
Substitute your preferred tools if you want, but this tutorial is assuming you have those listed above.
Step one: Create the tiles
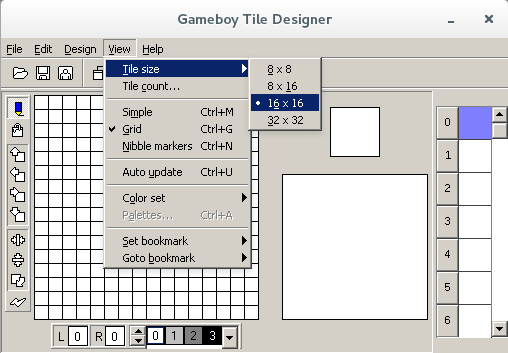
- Run GBTD. Click View, Tile Size, 16x16.
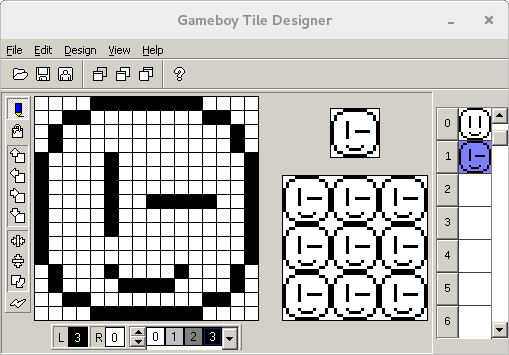
- Draw an image, copy and paste it into the second tile slot, and change that to make a two-frame animation. We'll be switching back and forth between these.
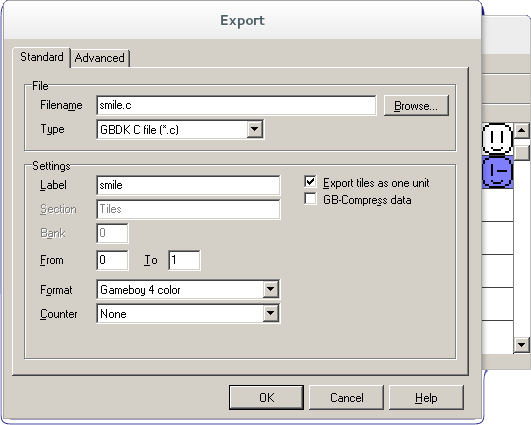
- Click File, Export To, change Type toGBDK C file (*.c) and To to 1. I've also changed Filename and Label to "smile". Hit OK.
- This creates a .c and a .h file. The .c file should look something like this:
//lots of comments
unsigned char smile[] =
{
  0x0F,0x0F,0x30,0x30,0x40,0x40,0x40,0x40,
  0x84,0x84,0x84,0x84,0x84,0x84,0x84,0x84,
  0x84,0x84,0x84,0x84,0x80,0x80,0x80,0x80,
  0x44,0x44,0x43,0x43,0x30,0x30,0x0F,0x0F,
  0xF0,0xF0,0x0C,0x0C,0x02,0x02,0x02,0x02,
  0x21,0x21,0x21,0x21,0x21,0x21,0x21,0x21,
  0x21,0x21,0x21,0x21,0x01,0x01,0x01,0x01,
  0x22,0x22,0xC2,0xC2,0x0C,0x0C,0xF0,0xF0,
  0x0F,0x0F,0x30,0x30,0x40,0x40,0x40,0x40,
  0x84,0x84,0x84,0x84,0x84,0x84,0x84,0x84,
  0x84,0x84,0x84,0x84,0x80,0x80,0x80,0x80,
  0x44,0x44,0x43,0x43,0x30,0x30,0x0F,0x0F,
  0xF0,0xF0,0x0C,0x0C,0x02,0x02,0x02,0x02,
  0x01,0x01,0x01,0x01,0x01,0x01,0xF9,0xF9,
  0x01,0x01,0x01,0x01,0x01,0x01,0x01,0x01,
  0x22,0x22,0xC2,0xC2,0x0C,0x0C,0xF0,0xF0
};
//more comments
GBTE just translated the pixels into an array with the name you wrote in the Label slot.
We'll be including the .c file in the code we're about to write.
Step two: set_sprite_data
Drawing sprites to the screen
GBDK handles sprites through a few functions found in gb.h.
Fire up your text editor and include the necessary files:
#include <gb/gb.h>  //Angle brackets check the compiler's include folders
#include "smile.c" //double quotes check the folder of the code that's being compiled
Note: in some cases, it may be necessary to include the complete file path (ex. "C:\{file path}\smile.c") in the #include statement for smile.c
Every C script needs a main function, so throw one of those in:
void main(){

}
This is where we'll be writing all our code.
Into the main function, type:
SPRITES_8x16;
set_sprite_data(0, 8, smile);
set_sprite_tile(0, 0);
move_sprite(0, 75, 75);
SHOW_SPRITES;
Line-by-line, this:
- tells GBDK to load two 8x8 sprites at once, making one 8x16 tile
- starting at zero, push eight 8x8 tiles from the
smilearray into running sprite data - set tile 0 to whatever sprite is in sprite number 0 in sprite data
- move sprite 0 to these coordinates
Note: set_sprite_data doesn't care if you drew the sprites in 8x8 or 8x16 or 16x16. Sprites will be pushed in 8x8 at a time, and what SPRITES_8x16 does is load the specified 8x8 sprite along with the one immediately below it. The gameboy can't handle 16x16 sprites, but we'll be faking it later on.
Here's the complete code so far:
#include <gb/gb.h>
#include "smile.c"

void main(){
	SPRITES_8x16;
	set_sprite_data(0, 8, smile);
	set_sprite_tile(0, 0);
	move_sprite(0, 75, 75);
	SHOW_SPRITES;
}
Save that to filename.c, and compile it with /path/to/GBDK/bin/lcc -o gamename.gb filename.c from the command line.
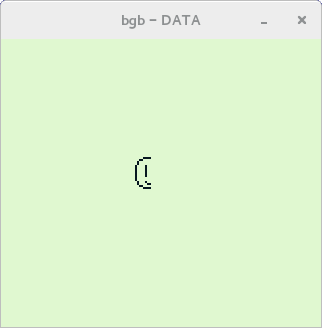
Run BGB and load the gamename.gb rom. Progress!
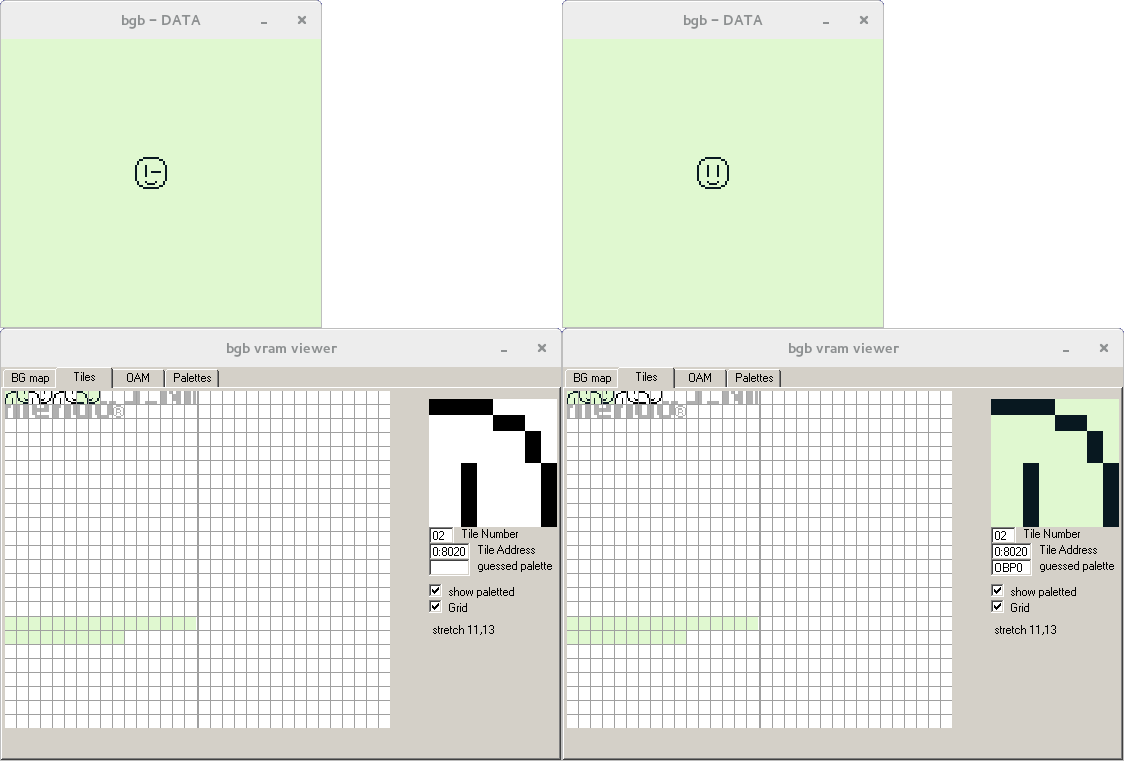
There's only half a face!
That's right. Since the gameboy can only handle up to 8x16 tiles, we're going to need to fake 16x16 tiles by drawing two 8x16 tiles together.
First, let's get a good visualization on how sprites and tiles are stored on the Gameboy.
In BGB, with the rom you've written loaded and running, right-click, mouseover Other, click VRAM viewer.
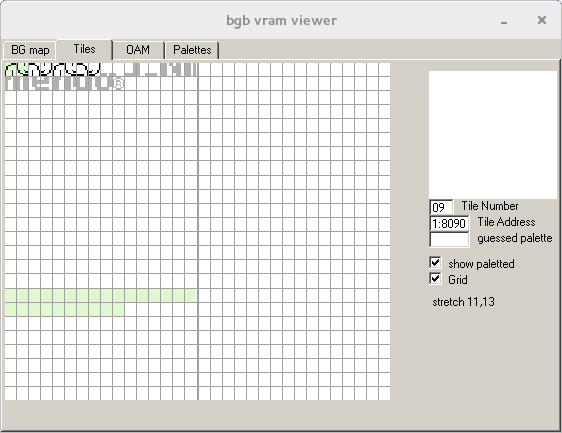
Here you can see the sprites we set with set_sprite_data arranged in 8x8 tiles. The two on the far left, 0 and 1, are lit up to indicate that they're in use. What we want is to set a second tile, fill it with the right half of the face, and line that up with the left half.
The right half
Add this to the code:
set_sprite_tile(1, 2);
move_sprite(1, 75 + 8, 75);
Counting in the VRAM viewer, the top-left quadrant of the face is sprite 0, the bottom-left is 1, and the top-right starts at 2, and the SPRITES_8x16 line will make the tile we set include sprite 3, and that's all four quadrants. We now have two sprites, numbers 0 and 1, active on the screen, and sprite 1 is 8 pixels further right than sprite 0, meaning it's lined up perfectly to display one 16x16 face.
Keep in mind that every time you move this sprite, you need to move both parts together.
Compile that and run it and check it out in the VRAM viewer.
Step three: Animate
We're going to use set_sprite_tile to alternate tiles on a timer.
Write a while loop in the main function after the SHOW_SPRITES; line, let's say while(1) so it will loop forever.
while(1){

}
Inside that loop, instruct the gameboy to change tile number 1 (the right side of the face) to sprite 6 (I counted using VRAM viewer).
set_sprite_tile(1, 6);
Swap it back and throw in a couple of delays so the changes are visible, and we've got this:
while(1){
	set_sprite_tile(1, 6);
	delay(500);
	set_sprite_tile(1,2);
	delay(500);
}
Here's all the code together for those copying and pasting:
#include <gb/gb.h>
#include "smile.c"

void main(){
	SPRITES_8x16;
	set_sprite_data(0, 8, smile);
	set_sprite_tile(0, 0);
	move_sprite(0, 75, 75);
	set_sprite_tile(1, 2);
	move_sprite(1, 75 + 8, 75);
	SHOW_SPRITES;

	while(1){
		set_sprite_tile(1, 6);
		delay(500);
		set_sprite_tile(1,2);
		delay(500);
	}
}
Compile that and run it. It works!
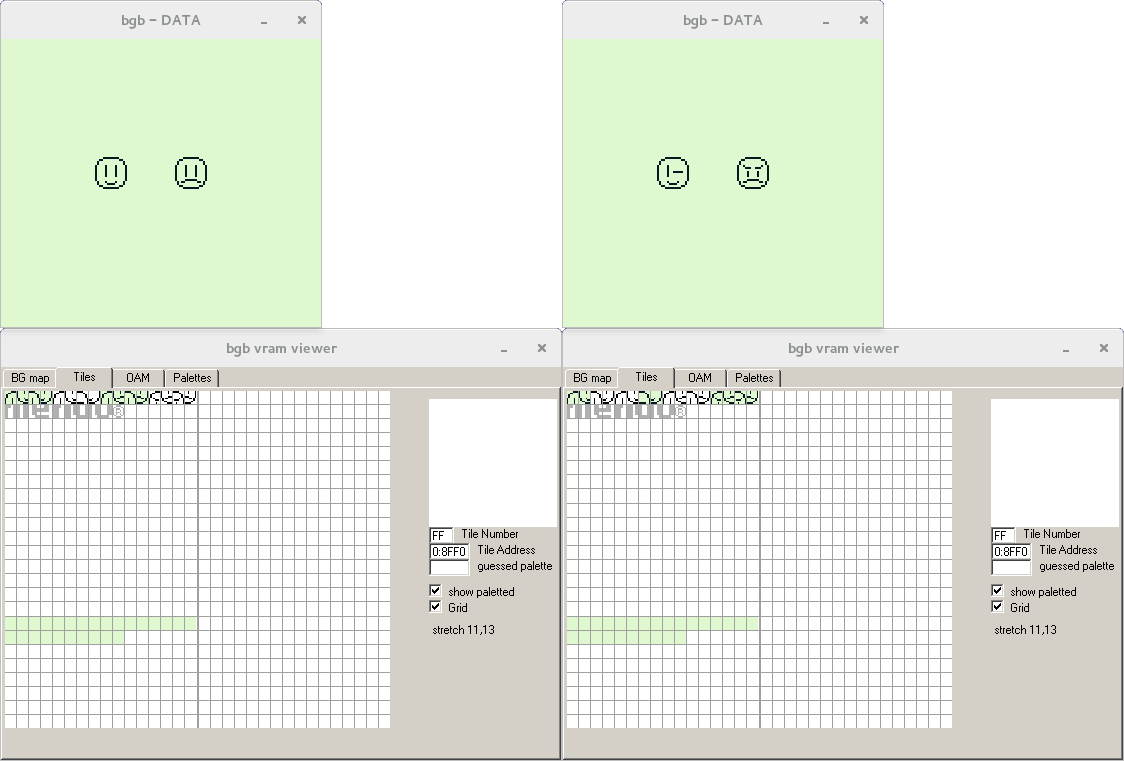
Check it out in the VRAM viewer to watch the tiles switch in real time.
An interesting note: Since only the right side of the sprite changes, the duplication of the left side is redundant. A future iteration might remove that to save data. Furthermore, only the top-right quarter changes, so if we were drawing four 8x8 tiles instead of two 8x16 tiles, we could save more space by only including and swapping that quadrant.
Now let's make this one degree more complicated: Loading multiple sprite sets.
Step four: Multiple sprite sets
This section is here to demonstrate the importance of keeping track of which sprites are stored where.
I made a second face for animating and exported it to frown.c with the label frown and included it into the code using the above methods.
Here's the array:
unsigned char frown[] =
{
  0x0F,0x0F,0x30,0x30,0x40,0x40,0x40,0x40,
  0x84,0x84,0x84,0x84,0x84,0x84,0x84,0x84,
  0x84,0x84,0x84,0x84,0x80,0x80,0x87,0x87,
  0x58,0x58,0x40,0x40,0x30,0x30,0x0F,0x0F,
  0xF0,0xF0,0x0C,0x0C,0x02,0x02,0x02,0x02,
  0x21,0x21,0x21,0x21,0x21,0x21,0x21,0x21,
  0x21,0x21,0x21,0x21,0x01,0x01,0xE1,0xE1,
  0x1A,0x1A,0x02,0x02,0x0C,0x0C,0xF0,0xF0,
  0x0F,0x0F,0x30,0x30,0x40,0x40,0x40,0x40,
  0x90,0x90,0x8E,0x8E,0x80,0x80,0x84,0x84,
  0x84,0x84,0x84,0x84,0x80,0x80,0x87,0x87,
  0x58,0x58,0x40,0x40,0x30,0x30,0x0F,0x0F,
  0xF0,0xF0,0x0C,0x0C,0x02,0x02,0x02,0x02,
  0x09,0x09,0x71,0x71,0x01,0x01,0x21,0x21,
  0x21,0x21,0x21,0x21,0x01,0x01,0xE1,0xE1,
  0x1A,0x1A,0x02,0x02,0x0C,0x0C,0xF0,0xF0
};
Let's set that into our sprite data in the main function (above the loop):
set_sprite_data(8, 8, frown);
Here's the point of this demonstration: While tiles progress numerically (tile 0, tile 1, tile 2...), set_sprite_data is just plugging 8x8 sprites into a data set. The first argument has to point at the first free sprite in memory, and we have to keep in mind that we've already filled in 0-7 with the 8 sprites of the smile art. If we set that first argument to anything less than 8, it'll overwrite parts of the smile, anything greater and there will be gaps between the two faces. The second argument is again the number of 8x8 tiles we're plugging in there, and our mental count ticks up to 16, meaning 0-15 are occupied.
A complication of this is that even if we have parallel animation cycles, we've got to remember where each tile is in memory. A benefit is that any tile can pull from anywhere in the sprite stack.
Let's duplicate the smile code for use with the new frown face, right down to swapping the sprites at the same time:
#include <gb/gb.h>
#include "smile.c"
#include "frown.c"

void main(){
	SPRITES_8x16;
	set_sprite_data(0, 8, smile);
	set_sprite_tile(0, 0);
	move_sprite(0, 55, 75);
	set_sprite_tile(1, 2);
	move_sprite(1, 55 + 8, 75);

	set_sprite_data(8, 8, frown);
	set_sprite_tile(2, 8);
	move_sprite(2, 95, 75);
	set_sprite_tile(3, 10);
	move_sprite(3, 95 + 8, 75);

	SHOW_SPRITES;

	while(1){
		set_sprite_tile(1, 6);
		set_sprite_tile(2, 12);
		set_sprite_tile(3, 14);
		delay(500);
		set_sprite_tile(1,2);
		set_sprite_tile(2, 8);
		set_sprite_tile(3, 10);
		delay(500);
	}
}
Notes:
- We're filling sprites numbered 2 and 3 with the left half and the right half of the second face.
- While the smiley switches between sprite data 2 (and 3) and 6 (and 7), the frown is cycling between 8 (and 9) and 12 (and 13) on the left side and 10 (and 11) and 14 (and 15) on the right, both sides at once.
Compile it and check it out in VRAM viewer!
Takeaway
Hopefully this has taught you how to load and display sprites using GBDK, or at least acted as real-life examples presented in human-readable form.
Exercises
Try some of these modifications out:
- Combine this with
the joypad() tutorialand wire the expressions to button inputs instead of a set timer - Move the faces around by calling
move_sprite()in thewhileloop - Come up with a way to track where sprites are stored, and refer to them by
offset + frame number - Switch to
SPRITES_8x8and animate each quadrant separately, and optimize the sprite data - Add backgrounds and experiment with sprites overlapping them (and fill in the faces so they're not transparent)
- Do it in color! Play it loud!
- While in color, overlap two sprites for a total of eight colors.
- Add sounds
- Write your own tutorial and post it to the wiki
